Wednesday 28 January 2015

FROZEN 3rd Birthday Cake!

Last week was my daughter's 3rd birthday.  In about November, she informed me that she NEEDED to have a frozen cake with "lotsa lotsa lotsa blue layers."  I was lucky enough to find some cute little frozen figurines on Amazon, which made this cake a very easy one.

The most time consuming part was baking the actual cake and making the icing, not decorating.   Since she wanted "lotsa blue layers", I needed to make a white cake.   Scratch white cake and I aren't exactly friends.  I find it really hard to make a white cake that isn't either super dense, or just weird tasting.  I'm usually pretty faithful to boxed white mix.  I can't say the same for chocolate cake (where it seems a scratch cake is always better).   This time I vowed I would make the cake from scratch.  Somehow I lucked out, because after trolling Pinterest for a recipe that looked different from all of those I've already tried, I think I found a keeper.  It's from Sweetapolita.  I didn't change a single thing about the recipe, and it was just the right density, stayed moist for 3 days, and even endured being frozen for a couple days before decorating!  Check out the recipe here.   As she suggests, make sure you measure carefully, and USE CAKE FLOUR.  It truly does produce better results!

For the decorating, I used Martha's swiss meringue buttercream.  It's less sweet than traditional buttercream, but honestly, I think I could have used an icing sugar variety.  The Sweetapolita cake recipe contains a buttercream recipe with it, and I would like to try it next time.  The cake has that perfect level of sweetness that I think a super-sweet icing wouldn't have overpowered it.  Next time I suppose.

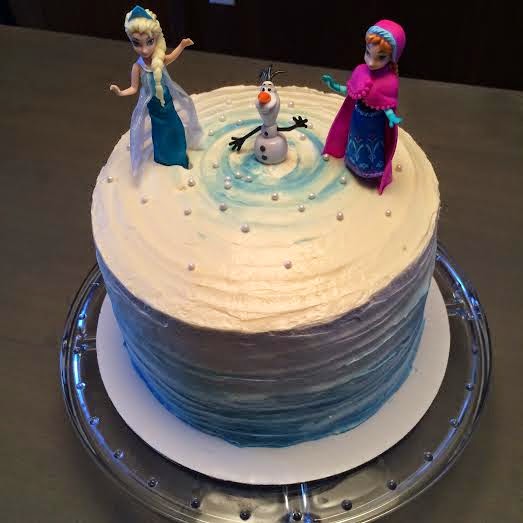
I crumb coated the cake and then iced it with plain white icing.  Then I tinted a few tablespoons of icing blue, added some to the bottom of the cake, and swirled it gradually up the cake while turning my cake turntable.  I did the same with the top of the cake by starting with a small gob of blue in the middle and swirling outward.  It made it look like Olaf was standing in the middle of a little snowstorm.

My daughter was thrilled (and so was I), with the results of such a simple technique.


Tuesday 20 January 2015

ALMOST perfect mini doughnuts

DISCLAIMER:  I call these "almost" perfect, because, let's face it.... absolutely nothing beats fried mini doughnuts from a carnival.  These are the next best easy thing to do at home in the oven.....


A few months ago I was at my friend Erica's house and fell in love with a delicious little snack she made.  It was a scrumptious little baked doughnut.  When she told me they were super simple to make, I promptly called my sister and asked that she please please please buy me the Epicure mini doughnut molds for Christmas.  She sells Epicure products, and I knew she would pull through for me.  Erica said that the recipe that comes with the doughnut pans was super simple and quick, and she was definitely right.

I couldn't seem to find the doughnut molds on the Epicure website , so I'm wondering if they discontinued them.  Regardless, go out and buy another brand of silicone mini doughnut pan, because it will be well worth it.

I finally got around to trying them yesterday afternoon with my daughter.  Our family was invited somewhere for a post-holiday drink and thought I should bring a treat with us.  I like to bring baked goods to other people because it means I get to enjoy the fun of making them, without having too much temptation to eat all 24 minute doughnuts in one sitting.

The finished product

Here is the super simple recipe (for 24 mini doughnuts):

1  1/4 cups all purpose flour
2 tsp baking powder
1/4 tsp salt
1/2 tsp cinnamon
6 tbsp soft butter
1/2 cup sugar
1 tsp vanilla extract
1 egg
1/3 cup milk (I used whole milk)
vegetable oil (for brushing the pans with)

In a small bowl, mix the flour, baking powder, salt, and cinnamon.  In a separate bowl, cream together the butter and sugar until light and fluffy.  Beat in the egg and vanilla.   Stir in the dry ingredients alternately with the 1/3 cup milk.  (I used about 3 additions of each).  Do not over mix.

After lightly brushing the doughnut pans with oil, I put the batter into a disposable pastry bag to fill the doughnut molds 2/3 full.  Bake in a preheated 400 degree F oven for about 12 minutes (or until a toothpick inserted in them comes out clean).  Let the silicone pans become cool to the touch before twisting the doughnuts out.  

I chose to toss my doughnuts in icing sugar (I used 1/2 a cup in a Ziploc bag).  Toss them when completely cool if using icing sugar.

Epicure also recommends using 1 cup of granulated sugar mixed with 2 tbsp cinnamon, and tossing them in this mixture when they are still slightly warm.  I haven't tried them this way but definitely will soon.....

This is a great recipe to make with kids because the stirring and measuring is simple for them.  At the end my daughter played with the little bit of leftover batter in the pastry bag, and even helped fill a few of the molds.  She's becoming quite the little baker at almost three!


Monday 12 January 2015

Nalysnyky

Last week I got one more dose of Christmas when I realized it was Ukrainian Christmas!   I never officially celebrated it as a kid, but my Grandma is Ukrainian, and many traditional dishes featured prominently throughout the holiday season growing up.  I did some Pinteresting and found this recipe for Nalysnky, from Claudiascookbook.com.  These are basically a crepe filled with cheese and dill.  My grandma's version used dry cottage cheese, but I didn't have any and used regular full-fat cottage cheese.   I altered the recipe slightly from Claudia's and came up with this:

For the crepes:

4 eggs
1 cup whole milk (I just always have this because this is what the munchkins drink)
1/2 cup water
1 cup flour
1/2 tsp salt

For the filling:
2 cups full fat cottage cheese (my grandmother always used dry)
2 eggs yolks
1 tbsp dill

**Claudia's recipe calls for 2 tbsp of whipping cream, but I didn't use it because the cottage cheese was plenty wet enough.  If I had used dry cottage cheese I would have added the whipping cream

For the crepes, whisk all of the eggs together until frothy.  Add remaining ingredients and whisk until smooth.  Heat a non-stick pan on the stove top (I used a 10 inch frying pan), and add about 1/2 to 3/4 cup (almost a full ladle) of batter to the pan.  (I lightly oiled the pan first).  Add it to the middle of the pan and then lift and twirl your pan a bit to evenly spread the batter.  After about 1 minute, gently flip the crepe and cook the other side.  If it's taking longer than 1 minute to be ready to flip your crepe, your pan is either not hot enough or you've added too much batter to the pan.  It takes a couple crepes to get in a groove.  


To prepare the filling, I put all of the ingredients in my food processor and gave it a quick blend for about 10 seconds.  

Next, generously coat each crepe with the cheese mixture, and then roll up tightly.  I got a total of 10 crepes with the above recipe (excluding 2 flops that I had to throw out).  Cut each rolled crepe into 3 sections so that they can be layered in a pan nicely.


I put my crepes in two 9x9 pans, and froze half for another day.  I remember my grandma making big batches and doing the same.  To make sure they don't all get stuck into one delightful clump (as they puff up during baking), it is very important to generously brush the bottom of the pan and top of the crepes with melted butter.  Plus it makes them even more delicious!  I melted about 1/4 cup of butter as suggested by Claudia, although I know this is significantly less than my grandma used.  However, I found this was PLENTY!  


Cover the pan tightly with foil and bake for about 30 minutes in a preheated 350 degree oven.

Unfortunately I don't have a photo of the finished product because I forgot..... but they looked almost as awesome as Claudia's picture, and tasted delicious!  Very close to my grandma's....and a perfect comfort food for a chilly holiday evening.  

Thursday 1 January 2015

The BEST Chocolate Fudge

Happy New Year!

I LOVE Christmas, and from about December 27-30th I am almost always stuck with post-holiday blues.  I always wish that it was still December 23rd with all the excitement of Christmas Eve and Christmas Day to come!  Somehow though, I resign to the fact that Christmas is over on New Year's Eve, and I get excited for a fresh new year.  The tree came down on New Year's Day, and it's time to start looking forward to all the great things life will have to offer me and my family for 2015 :)

I will still spend a solid few weeks having a treat or two from the extensive amount of Christmas baking I do in December.  People just didn't eat their fair share when they came to visit.  I basically make enough so that every person that visits my house needs to eat approximately 15 servings in order to make a dent in it.  I should have been posting recipes as I made different treats, but things just get busy.  Or I get baking and don't take any pictures.

Although late, here is one of my all time favorite Christmas recipes.  Fudge!  My absolute favorite treat to swipe from a tray of goodies.  This recipe is foolproof and just plain delicious.  You don't even need a candy thermometer, it is just that forgiving!

2/3 cup evaporated milk
1-2/3 cups white sugar
1/4 tsp salt
1-1/2 cups semisweet chocolate chips
1-1/2 cups miniature marshmallows

Bring the evaporated milk, sugar and salt to a boil in a medium sized pot, and cook for 5 minutes.  Make sure to stir constantly or it will scorch!  Let cool slightly (until very warm, but not hot), and stir in marshmallows and chocolate chips.  If they don't melt thoroughly, very gradually heat the mixture while stirring until smooth.  Immediately spread into a parchment lined 7x7 pan.  This is an odd size, so if you don't have this, you can use a larger one.  The fudge just won't be as tall because it will be a thinner layer.

Working fast with this fudge is the key -otherwise you won't be able to spread the mixture into the pan.  If this happens, use a hot knife to spread by warming a butter knife in a glass of hot water.

Enjoy!  You won't be disappointed.  It's oh so smooth and soft.  It also freezes very well.  One of these days I am going to substitute a flavored chocolate chip like butterscotch or mint for the regular chocolate chips as I'm sure that would make a delicious flavored variety :)

The finished product before being cut into bite sized deliciousness